Friday, January 11, 2013

Kielbasa Potato Skillet Recipe

One of my favorite comfort food recipes of all time that takes only as long as the potatoes do to cook- here is my kielbasa potato skillet recipe!


Kielbasa Potato Skillet

1. Start by chopping up 3-4 rinsed potatoes. You can peel them, but I usually don't. (The peel is where the nutrients are!)

2. Place the cubed potatoes into a preheated skillet with olive oil on medium-high heat. Season with salt, pepper, chili seasoning, rosemary and diced garlic to taste! (Honestly, I never measure the seasonings in this- just add a good amount for your preference.)

3. Dice up 1 medium sized onion (white or yellow) and place it in the skillet with the potatoes.

4. Stir everything together and cover. Lower the heat to medium and let the potatoes and onions cook.

5. Meanwhile, cut up 1 kielbasa sausage. This can be beef, turkey, pork, whatever. My favorite is polska kielbasa. Add it to the skillet.

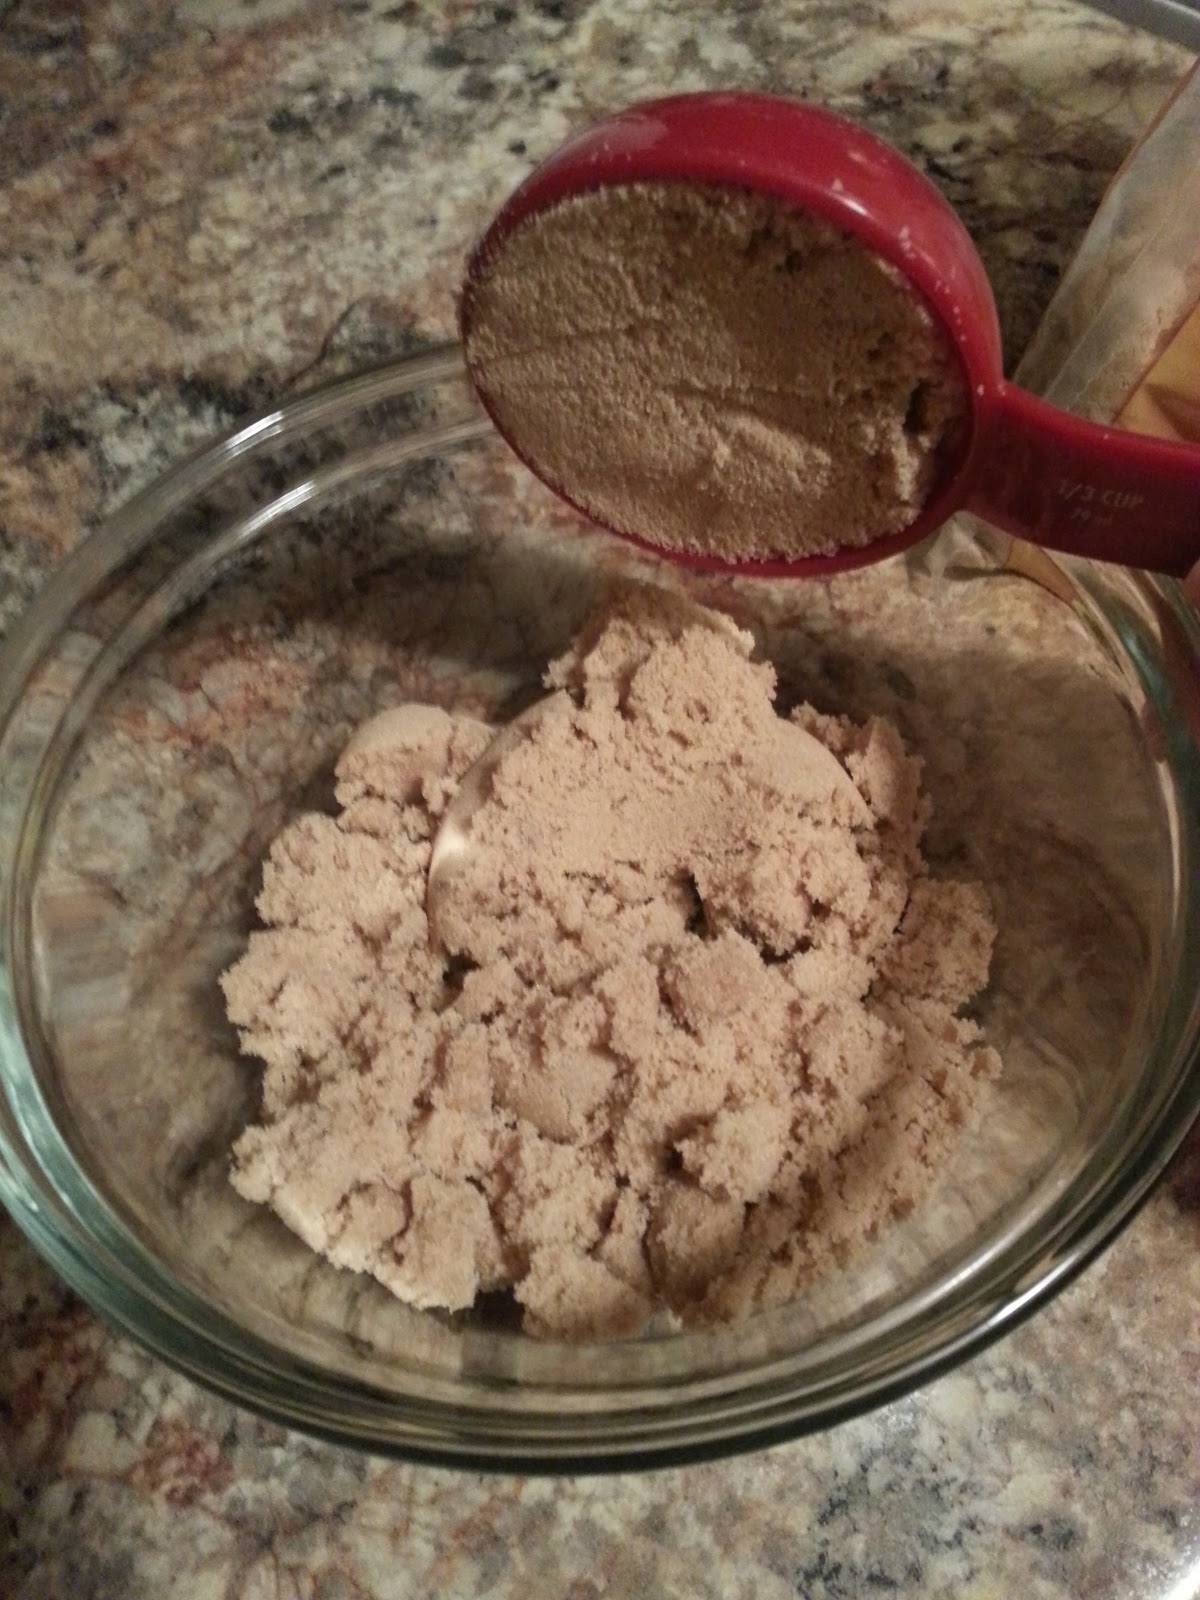
6. On top, sprinkle a little brown sugar (I use about 1 handful.) This is optional, but I love the flavor it gives the potatoes and onions!

7. Place the cover back on top and let it cook until the potatoes are fork tender. Be sure to stir it occasionally to prevent them from sticking to the pan.

8. To serve, I like to add a little shredded cheese on top. And there you have it!

Well I hope you all enjoy this recipe! Tell me any of your favorite skillet recipes, I love to learn more!

xoxoBrittany

Thursday, January 10, 2013

Make-Up Storage & Organization

I have to admit, one of my biggest obsessions in life other than organizing, is MAKEUP. Over the years I cant even imagine how much I've spent on cosmetics, hair, skin, nail and other beauty products! For this blog, I've decided to show you how I store and organize my make-up collection and a few tips for you! I hope you enjoy!

Make-Up Storage & Organization

So here is a quick shot of my vanity: I simply used an Ikea table and a mirror in back. To the right is a short bookshelf that contains more. 
I used this desk from Ikea because it has a large drawer that pulls out where I can put many items. Here I have some palettes, deodorant, make-up remover wipes, hair ties & bobby pins.
For the vanity I have 2 small 3-drawer organizers that hold items like lip balms, mascara, eyeliners, primers, etc. You can purchase them at Target, Walmart, etc. Across the top of the 2 organizers is a shelf I bought from Menards for a few bucks. This creates more storage on top!

Between the two organizers I have placed a simple plastic drawer organizer. You can find these in the kitchen or office supply section of many stores for only a few dollars.
On top of the shelf I have placed 2 short glasses to store my make-up brushes. I put my face brushes in one glass and my eye brushes in the other so I can find them easier.
Next to each brush holder I have 2 tea light candle holders that I am using to store cotton rounds and Q-tips. I found these ones with hearts on them in the dollar section at Target around Valentines day. It was only $2.50 for the set!
Now to the left of my desk/vanity I have small bookshelf that I'm using for more storage. On top  of the bookshelf I have 2 medium sized 3-drawer organizers stacked on top of each other. This is where the bulk of my make-up is organized by drawer. There is a lip-stick organizer to hold my most worn lipsticks and my favorite lip glosses.
On the shelves of the bookshelf I have plastic buckets that are organized by items. One (as shown below) houses all of my nail polishes, nail files, clippers & buffers. I have others for skin care items, lotions, etc.
There are also cloth baskets (found in the bathroom section of Target) that I'm using to store hair care products and miscellaneous items.
And there you have it! How I store and organize my make-up. I hope you found this blog helpful and can use it to organize some of your beauty items at home as well! If you have any great tips, please comment below, I am always looking for better ways to store things!!

xoxoBrittany


Tuesday, December 18, 2012

Storing & Organizing NYX Eyeshadow Pigments

One of my favorite affordable brands of makeup that I enjoy using is NYX. I purchase my NYX products at Ulta, but you can also find them online. I have always been a huge fan of eyeshadow pigments, for their versatility and vibrancy (despite how messy they can be). After purchasing MAC pigments for a while I decided to give the NYX ones a try and it turns out they're just as great as the MAC ones, and over $20 cheaper!! The only problem I have with the NYX pigments is they have a very small bottle design that doesn't let you access the make-up easily. As you can see from some photos below, you can't even put a small eyeshadow brush in these containers. So, with this issue, I came up with a super easy way to store and organize my different shadows and here it is:

STORING AND ORGANIZING NYX EYESHADOW PIGMENTS

All I do is transfer the pigments into a 7-day pill organizer that I purchased at the container store for $1.


Here is a picture of a few of my pigments transferred into the pill container:


Simply tap the bottom of the bottle and the pigments will fall out easily. (WARNING: You WILL make a mess!)


This is a comparison of trying to get pigments out of the original packaging vs. using the pill organizer: 


TADA!
 

A perfect way to conveniently store your pigments without making a huge mess! Hope you enjoyed this tip and I'll see you again soon!


xoxoBrittany

Sunday, December 16, 2012

Baking Bread-sticks (Just like Olive Garden!)

Today I want to share with you all a recipe that I tried recently to accompany some chicken alfredo I made the other day- homemade bread-sticks! These things are delicious! To find this recipe I simply searched "Olive Garden bread-sticks" because, you have to admit, they have pretty damn good ones! This is the following recipe that I went with and it turned out great! It tweaked it a little bit. Here it is:

Bread-sticks (Just like Olive Garden!)


Ingredients:

Bread
1 1/2 c. warm water
1 pkg. active dry yeast
4 1/4 c. all-purpose flour
2 tablespoons butter, melted
2 tablespoons sugar
1 tablespoon salt

Topping
1 stick of butter (melted)
2 teaspoons garlic powder
2 teaspoons salt
2 teaspoons Parmesan cheese

Directions:
  1. Dissolve sugar and yeast in the warm water to temp the yeast. Cover it for 10 minutes. When it's ready it will be frothy
  2. Add the flour and salt to the yeast mixture a little bit at a time. Add the melted butter half way through to help with combining. 
  3. On a floured surface, knead the dough until it is smooth.
  4. Cut the dough into pieces and shape them into bread-sticks. (This recipe makes about a dozen.)
  5. Place them on a greased cookie sheet and cover them with a towel. Sit them in a warm place for 45-60 minutes.
  6. Bake them for 6 or 7 minutes at 400 degrees.
  7. Take them out and brush them with the melted butter topping.
  8. Bake them for another 6-8 minutes or until they're starting to brown. (See picture)
Enjoy!!

I hope you all give this recipe a try, it really is super simple! Please comment below with your feedback. See you soon!

xoxoBrittany

Tuesday, December 11, 2012

DIY Body Scrub

One of my favorite things to do at home in my spare time (other than organizing) is to make DIY beauty products! Lotions, scrubs, lip balms, etc. Today I want to show you a very quick and easy way to make a DIY body scrub! At the store these things can cost you $10 or more, but with simple ingredients you already have at home, you can save tons of $$!!

DIY BODY SCRUB

Ingredients:
  • Sugar or salt
    • Use sugar in the raw or sea salt for a coarse scrub
    • Use regular white sugar or salt for an average scrub
    • Use brown sugar or kosher salt for a gentler scrub
  • Oil
    • Olive oil
    • Vegetable oil
    • Coconut oil
    • Baby oil
    • Whatever kind you have at home!
  • Vanilla Extract or Essential Oil (for fragrance)
What to do:
  1.  Measure sugar or salt into a bowl. (2 parts sugar/salt to 1 part oil) I used 2 cups.

2. Add the oil. I used 1 cup of body scrub oil that I purchased online.
 3. Mix the ingredients together.
 4. Add a few drops of essential oils or a teaspoon of vanilla extract for fragrance. This step is optional. Now is also when you would add food coloring if you wanted it to be colored. Mix again.
 5. Put the contents into a seal-able container. I used a mason jar for canning.
 6. And there you have it! Homemade sugar scrub! This is so simple and easy and it will last you a long time!

Making homemade scrubs can be tons of fun! You can change them up and mix them around to better suit your needs and taste. Add honey, lemon juice, coffee grinds, etc. etc. to create totally different experiences! I hope you enjoyed this DIY and I will be back with more soon!!

xoxoBrittany

Monday, December 10, 2012

Clean Your Coffee Maker

Now I don't know about all of you, but in my household, the one kitchen item that gets good use (i.e. at least once a day) is the coffee maker! After dozens and dozens of brews, coffee makers start to build up hard water deposits and coffee oils become rancid. Because of this, the best solution is to not only clean your coffee pot every so often, but to clean the inside of your coffee maker as well! The cleaning is actually very easy and can be done with a simple ingredient that most of us already have in our homes.

Cleaning Your Coffee Maker


What You'll Need:
  • White vinegar
  • Water
And that's it!

What to do:
  1. In your coffee pot, mix 1 part vinegar and 2 parts cool water. (If you haven't cleaned your coffee maker in oh, let's say a year since you bought the thing- you can use half and half.)
  2. Pour the mixture into the reservoir
  3. Put the pot in it's place and start the machine as usual
  4. When it's done "brewing" turn off the machine and let the water cool, then dump it.
  5. Lastly, do one last "brew" but this time of simply just water to rinse the machine.
TADA! And there you have it! A clean coffee maker! 

Other things to remember:
  • Do not use soap in your coffee pot- it can stick to the coffee oils and make your morning cup 'o Joe taste like soap for days. 
  • Instead, rinse with hot water and wipe clean. You can also use vinegar to clean the pot (just like you would a fish tank, right!?)
Do what the restaurants do: 
  • After the pot cools off, place lemon wedges (or limes) in your coffee pot and fill it with cold water. This will help prevent coffee build up. Sparkling water works great for this, too. In the morning, simply dump it out and rinse. Brew coffee as usual :)
  • Forgot to turn the pot off and now there's burnt coffee on the bottom of your pot? No problem!! Use kosher or rock salt (a few tablespoons) and crushed ice. Swirl it around and the burnt coffee with magically start lifting off the bottom. You may need to repeat this process a few times. Just make sure you wait until the pot is cool to do this or you could crack the pot. Some say to use lemon wedges during this process as well but I don't find it necessary. This can also be used to simply clean coffee build up.
 
Well that's it for today's lesson on cleaning coffee pots haha. Hope this was helpful and I hope to see you back again soon!
 
xoxoBrittany 


Thursday, December 6, 2012

Organize Your Life: Monthly Calendar

So there's you, there's your partner, your kids, your dog, your cat, etc. etc. The list goes on. How ever do you keep track of everything going on without forgetting!?! Well in my house, we use a dry-erase calendar board. This calendar helps me post up my work schedule, days that I volunteer, due dates, deadlines for school assignments, etc. Whenever my boyfriend wants to know what I'm doing that day or when my next day off is, he simply checks the board. Great idea, right? You can even use a different color for each person in your family!

Monthly Calendar


I chose the idea of a dry-erase calendar because there are several styles avaiable at Target, Walmart, Office Depot, etc. already. There's no need to make anything, simply fill in the dates and add your schedule. I also picked the dry-erase over a chalk board because there's no messy chalk dust to cover my house.

My calendar is placed on the wall in front of my backdoor so it's the first thing I see before I leave and the first thing I see when I walk in the back door. Everything is color-coded, my work schedule in blue, appointments in green, holidays/birthdays/etc. in red... However I want to categorize it that month. 

If you're interested in buying the BoardDudes Magnetic Dry Erase Calendar that I have above, you can find it at your local Target in the office supplies section. I got it for under $15. It came with 2 magnets and a black marker. I also picked up a pack of 4 dry-erase markers for color-coding. Expo even has packages of 10 or so colors for some serious creativity! To see the board online, click here.

Well I hope you all enjoyed this post- I'm always interested to see how other people organize their calendars, so feel free to comment/post pictures below! Thanks for stopping by and I'll see you soon!

xoxoBrittany